使用预加载脚本
学习目标
在本教程的这一部分,您将学习什么是预加载脚本,以及如何使用它来安全地将特权 API 暴露给渲染器进程。您还将学习如何使用 Electron 的进程间通信 (IPC) 模块在主进程和渲染器进程之间进行通信。
什么是预加载脚本?
Electron 的主进程是一个具有完全操作系统访问权限的 Node.js 环境。除了 Electron 模块,您还可以访问 Node.js 内置模块,以及通过 npm 安装的任何包。另一方面,出于安全原因,渲染器进程运行网页,默认情况下不运行 Node.js。
为了连接 Electron 不同的进程类型,我们需要使用一种特殊的脚本,称为预加载脚本 (preload)。
使用预加载脚本增强渲染器
BrowserWindow 的预加载脚本在一个同时拥有 HTML DOM 和有限的 Node.js 及 Electron API 子集的上下文中运行。
从 Electron 20 开始,预加载脚本默认是沙箱化 (sandboxed) 的,不再拥有对完整 Node.js 环境的访问权限。实际上,这意味着您拥有一个被 polyfill 的 require 函数,该函数只能访问有限的 API。
| 可用的 API | 详细信息 |
|---|---|
| Electron 模块 | 渲染器进程模块 |
| Node.js 模块 | events、timers、url |
| Polyfilled 全局变量 | Buffer、process、clearImmediate、setImmediate |
有关更多信息,请参阅 进程沙箱指南。
预加载脚本在渲染器加载网页之前注入,类似于 Chrome 扩展的 内容脚本。要为需要特权访问的渲染器添加功能,您可以通过 contextBridge API 定义 全局对象。
为了演示这个概念,您将创建一个预加载脚本,该脚本会将您的应用程序的 Chrome、Node 和 Electron 版本暴露给渲染器进程,并将其放在一个名为 versions 的全局变量中。
添加一个新的 preload.js 脚本,将 Electron 的 process.versions 对象的一些选定属性暴露给渲染器进程,并将其存储在名为 versions 的全局变量中。
const { contextBridge } = require('electron')

contextBridge.exposeInMainWorld('versions', {
  node: () => process.versions.node,
  chrome: () => process.versions.chrome,
  electron: () => process.versions.electron
  // we can also expose variables, not just functions
})
要将此脚本附加到您的渲染器进程,请在 BrowserWindow 构造函数中将它的路径传递给 webPreferences.preload 选项。
const { app, BrowserWindow } = require('electron')

const path = require('node:path')

const createWindow = () => {
  const win = new BrowserWindow({
    width: 800,
    height: 600,
    webPreferences: {
      preload: path.join(__dirname, 'preload.js')
    }
  })

  win.loadFile('index.html')
}

app.whenReady().then(() => {
  createWindow()
})
这里使用了两个 Node.js 概念:
__dirname字符串指向当前执行脚本的路径(在本例中是您的项目根文件夹)。path.joinAPI 将多个路径段连接在一起,创建一个在所有平台上都能工作的组合路径字符串。
此时,渲染器可以访问 versions 全局变量,所以让我们在窗口中显示该信息。可以通过 window.versions 或直接 versions 来访问此变量。创建一个 renderer.js 脚本,使用 document.getElementById DOM API 来替换 ID 为 info 的 HTML 元素的显示文本。
const information = document.getElementById('info')
information.innerText = `This app is using Chrome (v${versions.chrome()}), Node.js (v${versions.node()}), and Electron (v${versions.electron()})`
然后,修改您的 index.html,添加一个 ID 为 info 的新元素,并附加您的 renderer.js 脚本。
<!DOCTYPE html>
<html>
  <head>
    <meta charset="UTF-8" />
    <meta
      http-equiv="Content-Security-Policy"
      content="default-src 'self'; script-src 'self'"
    />
    <meta
      http-equiv="X-Content-Security-Policy"
      content="default-src 'self'; script-src 'self'"
    />
    <title>Hello from Electron renderer!</title>
  </head>
  <body>
    <h1>Hello from Electron renderer!</h1>
    <p>👋</p>
    <p id="info"></p>
  </body>
  <script src="./renderer.js"></script>
</html>
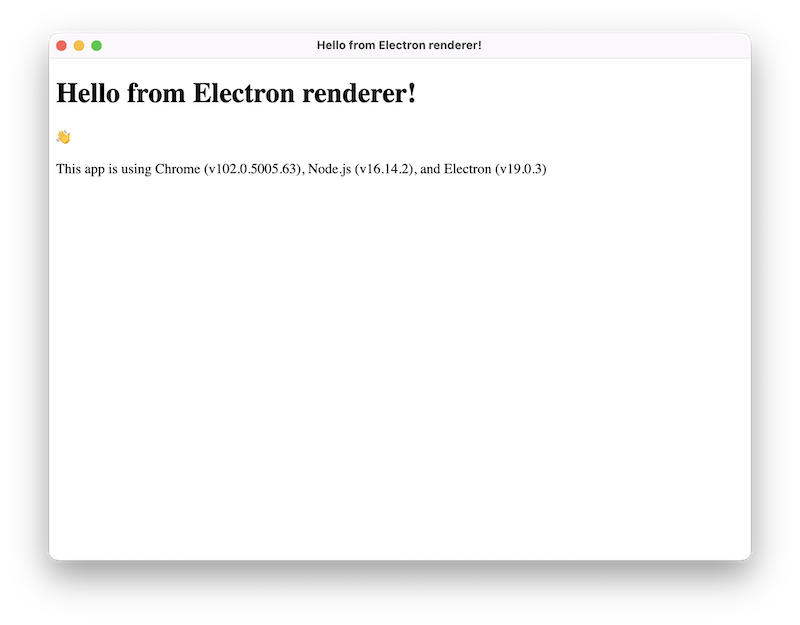
完成上述步骤后,您的应用程序应该看起来像这样:
代码看起来应该是这样的:
- main.js
- preload.js
- index.html
- renderer.js
const { app, BrowserWindow } = require('electron/main')
const path = require('node:path')

const createWindow = () => {
  const win = new BrowserWindow({
    width: 800,
    height: 600,
    webPreferences: {
      preload: path.join(__dirname, 'preload.js')
    }
  })

  win.loadFile('index.html')
}

app.whenReady().then(() => {
  createWindow()

  app.on('activate', () => {
    if (BrowserWindow.getAllWindows().length === 0) {
      createWindow()
    }
  })
})

app.on('window-all-closed', () => {
  if (process.platform !== 'darwin') {
    app.quit()
  }
})
const { contextBridge } = require('electron/renderer')

contextBridge.exposeInMainWorld('versions', {
  node: () => process.versions.node,
  chrome: () => process.versions.chrome,
  electron: () => process.versions.electron
})
<!DOCTYPE html>
<html>
  <head>
    <meta charset="UTF-8" />
    <meta
      http-equiv="Content-Security-Policy"
      content="default-src 'self'; script-src 'self'"
    />
    <meta
      http-equiv="X-Content-Security-Policy"
      content="default-src 'self'; script-src 'self'"
    />
    <title>Hello from Electron renderer!</title>
  </head>
  <body>
    <h1>Hello from Electron renderer!</h1>
    <p>👋</p>
    <p id="info"></p>
  </body>
  <script src="./renderer.js"></script>
</html>
const information = document.getElementById('info')
information.innerText = `This app is using Chrome (v${window.versions.chrome()}), Node.js (v${window.versions.node()}), and Electron (v${window.versions.electron()})`
进程间通信
如上所述,Electron 的主进程和渲染器进程承担着不同的职责,并且不能相互替代。这意味着无法直接从渲染器进程访问 Node.js API,也无法从主进程访问 HTML 文档对象模型 (DOM)。
解决此问题的方法是使用 Electron 的 ipcMain 和 ipcRenderer 模块进行进程间通信 (IPC)。要将消息从网页发送到主进程,您可以使用 ipcMain.handle 设置一个主进程处理程序,然后暴露一个调用 ipcRenderer.invoke 来触发预加载脚本中处理程序的函数。
为了说明这一点,我们将向渲染器添加一个名为 ping() 的全局函数,该函数将从主进程返回一个字符串。
首先,在您的预加载脚本中设置 invoke 调用:
const { contextBridge, ipcRenderer } = require('electron')

contextBridge.exposeInMainWorld('versions', {
  node: () => process.versions.node,
  chrome: () => process.versions.chrome,
  electron: () => process.versions.electron,
  ping: () => ipcRenderer.invoke('ping')
  // we can also expose variables, not just functions
})
请注意,我们将 ipcRenderer.invoke('ping') 调用包装在一个辅助函数中,而不是直接通过 context bridge 暴露 ipcRenderer 模块。您绝不应直接通过预加载脚本暴露整个 ipcRenderer 模块。这将使您的渲染器能够向主进程发送任意 IPC 消息,这会成为恶意代码的强大攻击向量。
然后,在主进程中设置您的 handle 监听器。我们在加载 HTML 文件之前执行此操作,以确保处理程序在您从渲染器发出 invoke 调用之前已准备就绪。
const { app, BrowserWindow, ipcMain } = require('electron/main')

const path = require('node:path')

const createWindow = () => {
  const win = new BrowserWindow({
    width: 800,
    height: 600,
    webPreferences: {
      preload: path.join(__dirname, 'preload.js')
    }
  })
  win.loadFile('index.html')
}
app.whenReady().then(() => {
  ipcMain.handle('ping', () => 'pong')
  createWindow()
})
一旦设置好发送方和接收方,您就可以通过您刚刚定义的 'ping' 通道从渲染器向主进程发送消息了。
const func = async () => {
  const response = await window.versions.ping()
  console.log(response) // prints out 'pong'
}

func()
有关使用 ipcRenderer 和 ipcMain 模块的更深入解释,请参阅完整的 进程间通信指南。
总结
预加载脚本包含在网页加载到浏览器窗口之前运行的代码。它既可以访问 DOM API,也可以访问 Node.js 环境,通常用于通过 contextBridge API 将特权 API 暴露给渲染器。
由于主进程和渲染器进程的职责截然不同,Electron 应用经常使用预加载脚本来设置进程间通信 (IPC) 接口,以便在两种进程之间传递任意消息。
在本教程的下一部分,我们将向您展示有关为您的应用程序添加更多功能的资源,然后教您如何将您的应用程序分发给用户。